

Omg yay, a tutorial! I finally decided to stop being lazy and I tried reverse stamping for the first time. I loved it so much, I thought I'd show you all how I did it. Keep reading for a step by step tutorial!
*CONTAINS PRESS SAMPLES
Most tutorials I read showed reverse stamping directly on the stamper. I only have one decent stamper, and I didn't want to wait for each individual decal to dry before I peeled it off and did another one. I decided to try doing this on a freezer bag! A sandwich bag probably wouldn't work as well because they're a bit more flimsy, but a freezer bag is nice and thick.Supplies needed:
- Plastic baggy. I would suggest using a ziplock freezer bag.
- Stamper. I used a creative stamper.
- Stamping polish. I used MDU Silver.
- Paint brush or dotting tool.
- Top coat. I used Out the Door.
- Polishes of your choice. I used Top Shelf Lacquer Tropical Cocktail Paradise Collection.
- Tweezers
- Scissors
- Something to put dots of polish on. I use a plastic artist palette I bought at a hobby store for $0.99.
- Clean up brush and acetone.
- Paint your nails a base of your choice. I used Top Shelf Lacquer Watermelon Malibu Surf. Top coat and let dry.

- Get your freezer bag and paint top coat patches onto it. I do several so I have many stamps to choose from. Let top coat dry. Stamp the top coat patches with your image. Be sure to pick an image that can be "colored in." I apply another layer of top coat to make sure the polish I use to color in the image doesn't bleed onto the stamp.

- Use a paint brush or dotting tool to color in image. Get creative! I made sure my images looked like a unicorn threw up on them. Don't worry if you color out of the lines. The image will look messy on the side that you're painting, but flip it over and see how pretty it is! Apply top coat if desired. Let dry for up to 30 minutes.


- This step is optional, you can choose to leave the decals on the plastic. I chose to cut out each one after they were dry enough. I then cut around the image so it would better fit my nail, I also cut out parts of the image I didn't want to transfer onto my nail. Make sure to remove the image from the plastic!
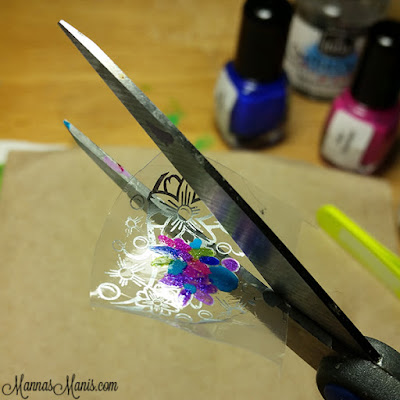

- Doing ONE FINGER AT A TIME, apply top coat. QUICKLY apply the stamping decal onto your nail and press firmly, but not so firmly that it smudges your nail polish.

- Take a brush dipped in acetone and remove excess decal from around your nails. If there's a lot of excess, you can cut it off with scissors. You can choose to use liquid latex so your clean up will be easier. Top coat.


I gotta say I was pretty impressed with these! I can't believe it's taken me so long to bite the bullet and just do it already. This took me almost 3 hours, so if you're going to try this be sure to clear your schedule for a while! Here is a pictorial for you. Save it, pin it, whatever! If you try this, let me know in the comments!


No comments